Install MYOB Sync from the Shopify App Store, authorise your MYOB
account, import your existing products and customers, then configure
the data flows you need. Check a first run before starting scheduled
syncing.
The Shopify listing names MYOB Business, AccountRight and Premier.
Available features depend on your MYOB subscription and company
file. Ask support to check older Essentials accounts or an
uncertain edition before installing.
The Free plan supports manual inventory syncing. Basic adds
scheduled inventory syncing; Plus adds customers, orders, invoices
and payments; Pro adds advanced flows including multiple locations
and payment-method mapping.
Compare the Shopify plans
before enabling a workflow.
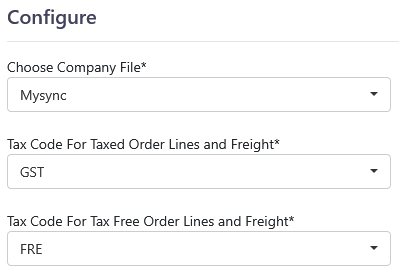
Company file and tax-code fields from the published Shopify guide.
The values shown are examples; select the codes appropriate to
your company file. Select the image to view it at full size.
Before you connect Shopify to MYOB
Have access to your Shopify store and the MYOB company file you
want to use. Decide which system will manage stock, whether you
want individual customer cards, and when Shopify orders should
become MYOB invoices.
Check that Shopify product and variant SKUs match the
corresponding MYOB item numbers exactly, including
capitalisation.
Confirm that the MYOB user you will authorise has access to the
correct company file and Single Sign On enabled.
Identify the MYOB tax codes, payment accounts and locations you
will select in the app.
Choose a plan that includes your required data flows. Complete
the configuration before starting the integration.
Already managing products in both systems?
Keep product creation in either direction switched off if you
want to continue creating products yourself. Inventory and order
flows can be configured separately.
Open the MYOB page in the app. Start the
connection and sign in on MYOB’s website with the user you have
prepared.
Authorise the connection. After authorisation,
you will return to Shopify to continue configuring your
integration.
Enable MYOB Single Sign On if needed
For an older AccountRight user, open the AccountRight desktop app
and go to Setup → User Access. Select the user
and check “sign on with a my.MYOB account”. If it
is not enabled, tick it, choose
Save and Invite and follow the emailed
instructions. Use that same account when connecting MYOB Sync.
Authorisation happens on MYOB’s website. MYOB provides access for
the integration, so you do not need to give MySync your MYOB
password. See the
illustrated Single Sign On guide
for existing and new users.
Import products and customers, then set your defaults
On the Settings page, run Sync Products and
Sync Customers before starting the integration.
These initial actions import existing records from Shopify and
MYOB into the app; they do not export new records to either
platform.
Select your Shopify store and MYOB account on the Settings page.
On the Configure page, choose the MYOB company file to use.
Select tax codes for taxed order lines and freight, and separate
codes for tax-free order lines and freight.
Enable the data flows you need and complete every required field
marked with an asterisk.
If a settings dropdown is missing data, use the app’s
Refresh button to reload the available options.
Review tax codes and account selections with the person
responsible for your MYOB accounts before you go live.
Save, test and start your sync schedule
Paid plans support scheduled syncing up to every 15 minutes. The
schedule settings also offer hourly, daily and weekly timings. The
Free plan provides manual inventory syncing.
Save your settings. Complete all required
fields and save. The Start button becomes available when the
required settings have been saved.
Check a first run. Use Run Now to trigger your
configured data flows without waiting for a schedule. This
performs a real sync, so review enabled flows and mappings
first.
Verify the result. Check a matched product’s
stock at the expected Shopify location. If syncing sales, check
the MYOB customer, document, tax codes and payment for a Shopify
order.
Start the schedule. Click Start to begin
scheduled data flows. Use Pause when you need to stop scheduled
syncing to review the configuration.
Review the Logs page after the first run and whenever you change a
data flow. Fix the underlying issue before retrying a failed
export.
Check your configuration
Confirm that the selected MYOB company file is the one you
intended to connect.
Check an existing product match before enabling inventory or
order exports.
Verify the first affected records in both systems; importing
records into the app is different from exporting them.
If a run reports an error, inspect its log before repeating the
action.
 my
my